

- << Back to Blogs index
Monitoring With a Total Station
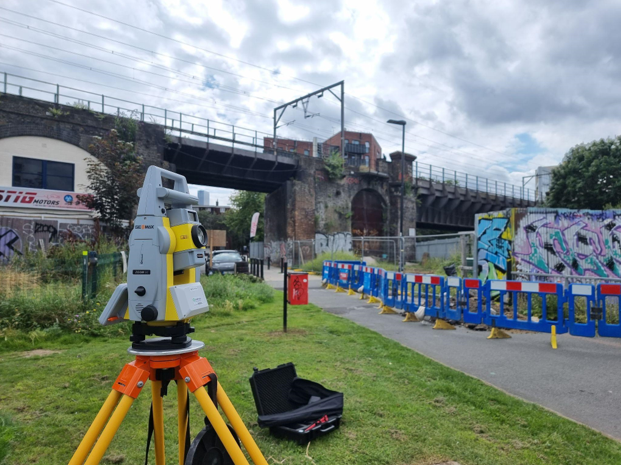
We recently supported a civil engineer in East London to set up a total station to monitor a bridge whilst piling was taking place nearby. The results were excellent and allowed work to continue, safe in the knowledge that there was no movement on the railway viaduct above. In light of this recent project, this article explores what monitoring is, how to do it, and some aspects to look out for in your surveying equipment.
What Is Monitoring?
The dictionary definition of monitoring is to ‘observe and check the progress or quality of (something) over a period of time; keep under systematic review.’
That can mean different things depending on your project. It can mean putting ‘tell tales’ over cracks to see if they’ve widened during works. It can mean installing remote sensors that measure vibration, sound or dust levels. If that’s what you’ve been asked to do, we can also help with that (generally if you have a project that might need surveying equipment, you can always call or email to discuss it first), but this article is about monitoring with a total station. That means repeatedly performing the same measurements and comparing the results. And the key here is repeatability. Henry Ford split his production line into specialisms rather than the way it was previously done with whole cars being made by the same team; he did this because he knew that when they did the same thing under the same conditions they got better, more consistent results. Now robots build our cars for the very same reason, which is a similarity with monitoring we will come on to.
How Do You Monitor With a Total Station?
First of all you set up your total station either on a known point with a backsight to another point or through the freestation method where it calculates the position after making measurements to two or more known points (the more the better, and make sure they’re not all in the same direction). Remember, the points you use to set up should not also be the ones you are monitoring. After that, you measure the set of points on the item you are monitoring as well as some that are not and you compare your results against your initial set of results. If the readings are the same, then the item you’re monitoring hasn’t moved. The difficulty with total station monitoring however, is that you need to make sure you do every step in a way that minimises errors as much as possible: because if you’ve only got a tolerance of a couple of millimeters and you do a bad set up, the errors are going to make it look like there has been a lot of movement when that’s not necessarily the case.
'Delay Is Preferable To Error’ - Thomas Jefferson
So step back for a second and think about how you can eliminate errors in your monitoring practice. First of all, what are you setting up on? You need at the very least a heavy wooden tripod, but for ultimate stability and repeatability, why not get a Surivpod Boltfix. You could use any total station for monitoring, but where every milimetre counts, you need to be aware of the angular accuracy of your instrument. For monitoring, it’s generally recommended that you use a 1” instrument rather than the 5” versions that are employed at most construction sites. And that instrument should be from a brand that you trust to deliver the accuracy it says it will. Geomax, as part of the Hexagon group of global geospatial companies which includes Leica Geosystems, will provide the reliable accuracy you need for a tough task like this. And finally, has it been calibrated recently by a reputable service agent? If you’re not sure, you can call in to our service workshop and we can make sure your survey equipment is working as it should be and fully calibrated.
Robot Is Best
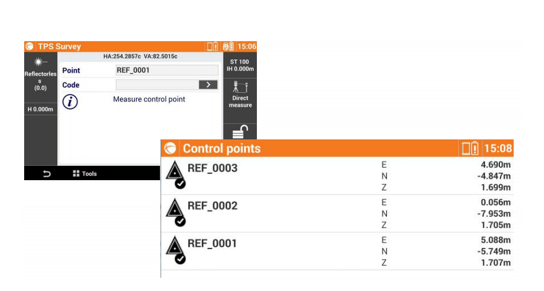
To err is human, as they say, so the final way to reduce errors is to make sure that the entire process of measurement is completed robotically. With the Geomax Zoom95 and automeasuring module for X-Pad the whole process is completed automatically, with a report generated by the software, cutting out the possibility of you getting something wrong. Here’s the process:
1. Set up some Control Points. These are used to perform the station setup before each measuring session. It also allows the Total Station to calculate a scale factor to correct for temperature and pressure variations.
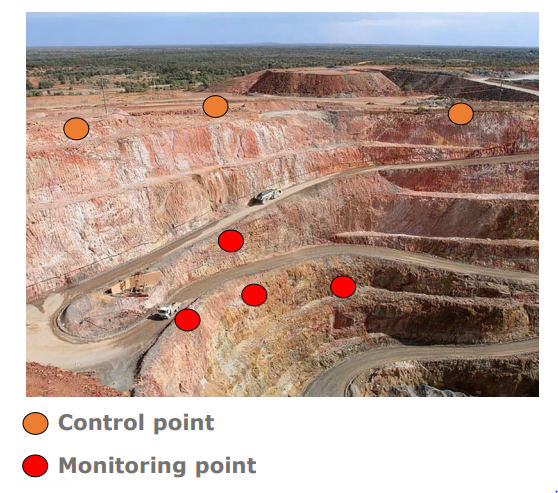
2. Set up the points to be auto measured - these can either be measured or imported like the control points. There’s no limit to how many of these you can set up.
3. Monitor! This can be done in two different ways, depending on whether you want to leave the total station where it is permanently or not:
- Single Session – initiated by user, operator checks if tolerances have been overpassed.
- Monitoring Session – Requires independent power source, but instrument works robotically and generates reports at defined intervals.
You can customise parameters such as tolerance values for each prism, how much time to measure a point and whether to measure with face 1 & 2 or just face 1.
Reports are then automatically sent to one or more emails or uploaded on one or two defined ftp servers.
If you’d like to see this in action, we made a video that you can view right here:
And more importantly, if you have a project that you think needs monitoring with a total station or any other piece of surveying equipment from ground penetrating radar to lidar drones and every kind of laser in between, you can get in touch and discuss it with us!


Stay up to date
Sign up now to receive the latest style emails, sale alerts and more.